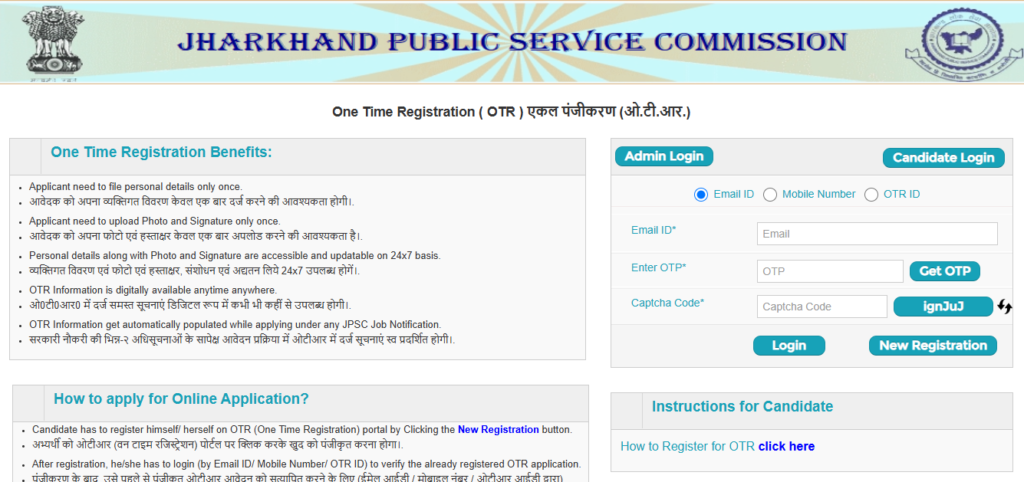
Introduction to JPSC One Time Registration (OTR)
The JPSC One Time Registration (OTR) portal requires candidates to enter their profile details correctly to avoid issues during the application process. Below is a detailed step-by-step guide to filling out the JPSC One Time Registration (OTR) form.

Useful Links for JPSC Preparation
Best JPSC Coaching in Jharkhand
JPSC Notes for Prelims and Mains
Recommended Books for JPSC Exam
Accessing the JPSC Official Website
Click Here to go to JPSC official Website. Click on New Registration
Step-by-Step Guide to Filling the JPSC OTR Form
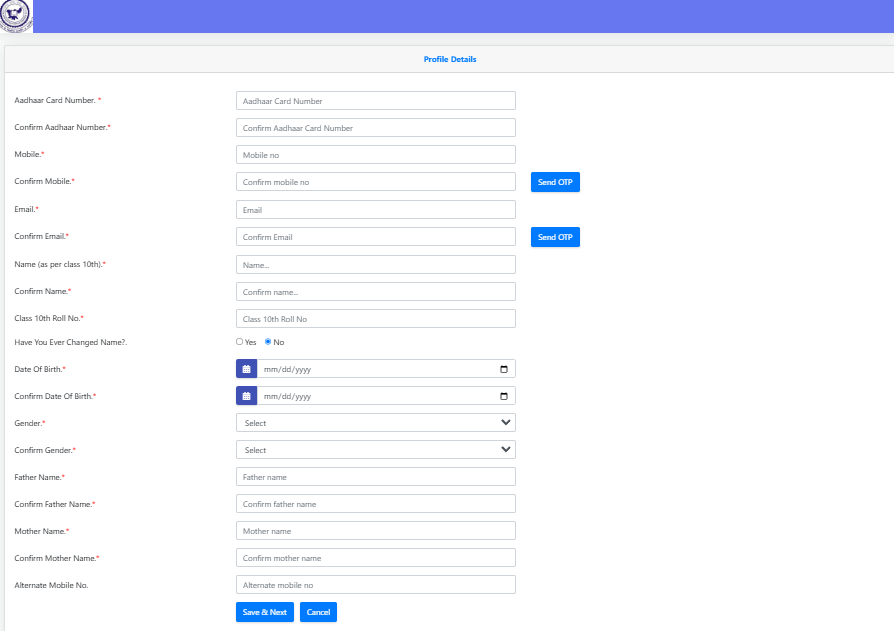
Step 1: Aadhaar Card Details
🔹 Enter your Aadhaar Card Number and Confirm Aadhaar Card Number.
🔹 Ensure that the Aadhaar number matches your official records.
✅ Important: Your Aadhaar details will be used for authentication and verification.
Step 2: Mobile Number & Email Verification
🔹 Enter your Mobile Number and Confirm Mobile Number.
🔹 Click Send OTP to receive a One-Time Password (OTP) for verification.
🔹 Enter your Email ID and Confirm Email ID.
🔹 Click Send OTP to verify your email.
✅ Important: Ensure that your email and mobile number are active, as all notifications will be sent to these.
Step 3: Personal Information
🔹 Name (as per Class 10th Certificate): Enter your name exactly as it appears in your matriculation (10th) certificate.
🔹 Confirm Name: Re-enter your name to confirm.
🔹 Class 10th Roll Number: Enter your 10th board roll number.
✅ Note:
- Do not use any prefixes such as "Mr." or "Ms." unless your official name consists of only three letters.
- This name will be used in all JPSC applications, so ensure accuracy.
Step 4: Name Change History (If Applicable)
🔹 Have You Ever Changed Your Name? Select Yes or No.
🔹 If Yes, provide relevant details as per legal documents.
✅ Important: If you have changed your name legally, ensure that you have supporting documents (such as a gazette notification).
Step 5: Date of Birth Verification
🔹 Enter your Date of Birth (DOB) in the mm/dd/yyyy format.
🔹 Confirm your Date of Birth by re-entering it.
✅ Note: Your DOB must match the details recorded in your Class 10th Certificate.
Step 6: Gender Selection
🔹 Select your Gender (Male/Female/Others) from the dropdown menu.
🔹 Confirm your gender by selecting it again.
Step 7: Father’s & Mother’s Name
🔹 Father’s Name: Enter your father’s name exactly as recorded in your Class 10th Certificate.
🔹 Confirm Father’s Name: Re-enter it to confirm.
🔹 Mother’s Name: Enter your mother’s name.
🔹 Confirm Mother’s Name: Re-enter it for verification.
✅ Important:
- Do NOT use prefixes like Shri, Dr., or Mr. while entering father’s or mother’s name.
- Ensure accuracy, as this information will appear in your official JPSC records.
Step 8: Alternate Contact Details (Optional)
🔹 Enter an Alternate Mobile Number (if available).
🔹 This can be helpful in case you lose access to your primary number.
Step 9: Final Submission
🔹 Click Save & Next to proceed to the next step.
🔹 If you need to make changes, click Cancel to re-enter your details before submission.
Important Notes for JPSC OTR Registration
✔ Use only official details as per government records.
✔ Avoid errors in Aadhaar, Name, DOB, and Contact Information, as they cannot be changed easily later.
✔ Verify OTPs for Mobile & Email before proceeding to avoid login issues.
✔ Check the JPSC official website (www.jpsc.gov.in) for updates.
📢 Complete your JPSC One Time Registration today and apply seamlessly for upcoming Jharkhand government exams! 🚀
What to Do After JPSC One Time Registration (OTR) – Next Steps
Once you have successfully completed the JPSC One Time Registration (OTR), follow these steps to ensure a smooth application process for JPSC exams and job notifications.
Step 1: Login to JPSC OTR Portal
🔹 Visit the JPSC official website: www.jpsc.gov.in
🔹 Click on OTR Login
🔹 Enter your Email ID, Mobile Number, or OTR ID
🔹 Enter the OTP received on your registered mobile/email
🔹 Solve the Captcha Code and click Login
✅ Tip: Save your OTR ID for future reference.
Step 2: Verify & Update Profile Details
After logging in, verify that all your details (Name, Date of Birth, Address, Educational Qualifications, etc.) are correct.
🔹 If required, update your details (except Aadhaar & DOB, which are non-editable).
🔹 Re-upload a new photo or signature if necessary.
🔹 Save changes and log out.
✅ Important: Ensure all details are correct before applying for JPSC notifications.
Step 3: Check Latest JPSC Job Notifications
🔹 Click on the “Latest Notification” tab.
🔹 Browse available JPSC recruitment advertisements.
🔹 Select the desired JPSC Exam or Job for which you want to apply.
🔹 Click "Apply Now" to proceed with the application.
✅ Tip: Regularly check for new job notifications to avoid missing deadlines.
Step 4: Fill & Submit JPSC Job Application
🔹 The system will auto-fill your OTR details into the application form.
🔹 Enter additional details like category (SC/ST/OBC/EWS), preference, and exam center.
🔹 Upload any specific documents required for the job (caste certificate, domicile, etc.).
🔹 Click Submit Application.
✅ Important: Review the filled application before final submission.
Step 5: Pay Application Fee
🔹 Pay the exam fee online via debit/credit card, UPI, or net banking.
🔹 Save the payment receipt for future reference.
✅ Tip: If the fee is deducted but the application shows pending, wait 24 hours before retrying.
Step 6: Download & Print Application Form
🔹 After successful submission, download the application PDF.
🔹 Take a printout for reference.
✅ Tip: Keep a hard copy & soft copy of your application for future use.
Step 7: Prepare for the Exam
✔ Download JPSC syllabus & previous year question papers.
✔ Attempt mock tests on platforms like LearnPro.
✔ Stay updated with Jharkhand current affairs & exam updates.
JPSC OTR Helpdesk (For Any Issues)
📞 Contact Numbers: 7979970392, 8340331314
📧 Email ID: helpdesk@jpscexam.com
⏰ Support Timings: Monday to Saturday (10:00 AM - 06:00 PM)
📢 Complete your JPSC application today and start preparing for success! 🚀
Frequently Asked Questions (FAQ) – JPSC One Time Registration (OTR)
Here are the most common questions related to JPSC One Time Registration (OTR), application process, and exam details.
1. What is JPSC One Time Registration (OTR)?
Answer: JPSC One Time Registration (OTR) is a system where candidates register once with their personal details, Aadhaar, photo, and signature. This information is stored and auto-filled whenever they apply for any JPSC recruitment exam.
2. Is JPSC OTR mandatory for applying to JPSC exams?
Answer: Yes, OTR is mandatory for applying to any JPSC recruitment, including JPSC Civil Services, Assistant Professor, Medical Officer, and other state-level exams.
3. How can I register for JPSC OTR?
Answer: Follow these steps to register:
- Visit www.jpsc.gov.in
- Click New Registration under the OTR Portal
- Enter details like Aadhaar Number, Mobile Number, Email, Name, DOB, and Class 10 Roll Number
- Verify OTP received on mobile and email
- Upload photo and signature
- Submit the form
4. Can I edit my details after registration?
Answer:
- You can update/edit your photo, signature, email, mobile number, and address anytime.
- Aadhaar Number, Name, and Date of Birth cannot be changed after submission.
5. What if I forget my OTR ID or password?
Answer:
- Go to the OTR Login Page.
- Click on "Forgot OTR ID?" and enter your registered mobile or email to retrieve it.
- If you forgot your password, reset it via OTP verification.
6. How do I apply for a JPSC exam after completing OTR?
Answer:
- Log in to the JPSC OTR Portal.
- Click on the Latest Notifications tab.
- Select the desired exam and click Apply Now.
- Fill in additional details (category, exam center, etc.).
- Pay the application fee online.
- Download and print the application form.
7. What documents are required for JPSC OTR?
Answer:
✔ Aadhaar Card (Mandatory)
✔ Class 10th Marksheet & Roll Number
✔ Recent Passport-Size Photo (JPEG/PNG format)
✔ Scanned Signature (JPEG/PNG format)
8. What is the format and size required for photo and signature upload?
Answer:
- Photo Size: 50 KB – 100 KB (JPEG/PNG)
- Signature Size: 20 KB – 50 KB (JPEG/PNG)
- Background: White or light-colored
✅ Tip: Use a clear and recent photo for hassle-free verification.
9. Can candidates from other states apply for JPSC exams?
Answer: Yes, but only Jharkhand domicile candidates are eligible for reservation benefits (SC/ST/OBC/EWS). Others will be considered under the General category.
10. How do I check my application status?
Answer:
- Log in to the JPSC OTR Portal.
- Click on “My Applications” to check your application status.
- You can view details like payment status, exam center, and admit card download link.
11. How do I pay the application fee?
Answer:
You can pay the JPSC exam application fee through:
✔ Debit/Credit Card
✔ Net Banking
✔ UPI Payment
✅ Tip: Keep a screenshot of payment receipt for future reference.
12. What happens if my payment fails?
Answer:
- Wait 24 hours and check your bank statement to confirm the deduction.
- If the amount is deducted but not updated on the portal, contact JPSC Helpdesk.
- If unsuccessful, try making the payment again.
📞 JPSC Helpdesk Contact:
Phone: 7979970392, 8340331314
Email: helpdesk@jpscexam.com
13. Can I apply for multiple JPSC exams using one OTR?
Answer: Yes! Once registered, you can apply for multiple JPSC job notifications using the same OTR ID without entering details again.
14. What should I do if I don't receive an OTP during registration?
Answer:
✔ Check your spam/junk folder in email.
✔ Ensure your mobile network is active and try resending the OTP.
✔ If the issue persists, contact JPSC Helpdesk.
15. How will I receive my JPSC Admit Card?
Answer:
- Admit cards will be available online before the exam.
- Log in to the JPSC OTR Portal and download it from the “My Applications” section.
- No hard copy will be sent via post.
✅ Tip: Take two printed copies of your admit card for the exam.
16. What should I do if I make a mistake in my application?
Answer:
- Minor errors like photo/signature replacement can be updated anytime.
- If the mistake is in Name, Aadhaar, or DOB, you may need to re-register or contact JPSC Helpdesk.
17. What is the age limit for JPSC exams?
Answer:
✔ General Category: 21 to 35 years
✔ OBC (BC-1 & BC-2): 21 to 37 years
✔ SC/ST (Male & Female): 21 to 40 years
✔ Female (General/OBC): 21 to 38 years
✅ Note: Some posts have different age relaxations. Check official notifications for details.
18. Where can I find JPSC exam notifications?
Answer:
- Official website: www.jpsc.gov.in
- Newspapers: Prabhat Khabar, Hindustan, and The Telegraph (Jharkhand Edition)
- Online platforms like LearnPro for Jharkhand Government Exam updates.
19. Is JPSC OTR free of cost?
Answer: Yes, One Time Registration (OTR) is completely free. However, candidates need to pay the application fee for each exam separately.
20. Can I register for OTR using someone else’s mobile number or email?
Answer: No. It is mandatory to use your personal mobile number and email because:
✔ All exam-related updates will be sent to your registered mobile & email.
✔ You need OTP verification for future logins & form submissions.
21. How can I contact JPSC for further queries?
📞 JPSC Helpdesk:
- Phone: 7979970392, 8340331314
- Email: helpdesk@jpscexam.com
- Timings: Monday to Saturday (10:00 AM – 06:00 PM)
📢 Start your JPSC One Time Registration today and stay ahead in your government job preparation! 🚀
Frequently Asked Questions
What are the essential details required for the JPSC OTR registration?
Candidates need to provide their Aadhaar card number, mobile number, and email address. Additionally, they must enter personal information, such as name and date of birth, exactly as per their Class 10th Certificate to ensure accuracy in the registration process.
How can candidates verify their mobile number and email during the registration process?
To verify their mobile number, candidates must enter their number and request a One-Time Password (OTP) that they will receive via SMS. Similarly, they need to input their email address and send another OTP to confirm their email, ensuring they have access to both for future notifications.
What should candidates do if they have changed their name legally?
If a candidate has changed their name, they should select 'Yes' in the name change history section and provide the relevant details as per their legal documents. Supporting documentation, such as a gazette notification, may be required to validate the name change during the registration process.
What precautions should one take while filling out the JPSC OTR form?
Candidates should use only official details consistent with government records, especially for Aadhaar, name, and date of birth. It's crucial to double-check all entries for accuracy, as corrections after submission can be challenging or impossible, and verify all OTPs received during the verification process.
Is it necessary to provide an alternate contact number during the JPSC OTR registration?
Providing an alternate contact number is optional but recommended, as it offers a backup for accessing the registration details if the primary number becomes unavailable. This can be crucial for communication regarding exam notifications and other important updates related to the JPSC process.
About LearnPro Editorial Standards
LearnPro editorial content is researched and reviewed by subject matter experts with backgrounds in civil services preparation. Our articles draw from official government sources, NCERT textbooks, standard reference materials, and reputed publications including The Hindu, Indian Express, and PIB.
Content is regularly updated to reflect the latest syllabus changes, exam patterns, and current developments. For corrections or feedback, contact us at admin@learnpro.in.